Setting up email hosting for a domain involves a few key steps. First, choose a hosting provider.
Next, configure your domain and email settings. Email hosting is essential for businesses and personal use. It allows you to have a professional email address linked to your domain. This guide will help you understand the process. From selecting the right provider to configuring your settings, we’ll cover it all.
By the end, you’ll be able to set up email hosting for your domain easily. Stay tuned to learn how to make your email address look professional and trustworthy.

Choosing The Right Email Hosting Provider
Choosing the right email hosting provider is crucial. It can impact your business communication and productivity. The right provider ensures your emails are secure and reliable. Let’s explore the factors you should consider and some popular providers.
Factors To Consider
First, look at the storage space offered. You need enough space for your emails and attachments. Check if the provider offers scalable options. This helps when your business grows.
Next, consider the security features. Your emails may contain sensitive information. Ensure the provider offers strong security measures like encryption and two-factor authentication.
Customer support is also important. Problems can occur anytime. A provider with 24/7 support can help you resolve issues quickly. Make sure they offer multiple support channels like phone, chat, and email.
Another factor is the ease of use. The platform should be user-friendly. This saves time and reduces frustration. Look for providers that offer an intuitive interface and easy setup process.
Popular Providers
G Suite by Google is a popular choice. It offers ample storage, strong security, and reliable support. Its user-friendly interface makes it easy to navigate.
Microsoft 365 is another trusted option. It provides robust security features and integrates well with other Microsoft products. This makes it a good choice for businesses already using Microsoft tools.
Zoho Mail is a cost-effective option. It provides basic features at a lower price point. It’s good for small businesses or startups.
ProtonMail offers top-notch security. It uses end-to-end encryption, ensuring your emails are safe. This is ideal for businesses dealing with sensitive information.
Each provider has its strengths. Choose one that fits your business needs best. Consider the factors discussed to make an informed decision.
Registering Your Domain
Before you can set up email hosting for your domain, you need to register your domain. This process involves choosing a unique domain name and registering it with a domain registrar. Let’s break down the steps involved in this process.
Domain Registration Process
The domain registration process is straightforward. Follow these steps to register your domain:
- Choose a Domain Registrar: Select a reputable domain registrar. Examples include GoDaddy, Namecheap, and Google Domains.
- Search for Your Domain Name: Use the registrar’s search tool to check if your desired domain name is available.
- Register Your Domain: If the domain name is available, proceed to register it. Fill in your personal details and pay the registration fee.
- Verify Your Email: After registration, the registrar will send a verification email. Follow the instructions to verify your email address.
Choosing A Domain Name
Choosing the right domain name is crucial. Here are some tips to help you pick the perfect domain name:
- Keep It Short and Simple: A short and simple domain name is easy to remember and type.
- Use Keywords: Incorporate relevant keywords that reflect your business or brand.
- Avoid Numbers and Hyphens: Numbers and hyphens can be confusing and hard to remember.
- Check for Trademarks: Ensure your domain name does not infringe on any existing trademarks.
- Choose the Right Extension: Common extensions include .com, .net, and .org. Choose the one that best suits your business.
Registering your domain is the first step in setting up email hosting. By following these steps, you will have a unique domain name ready for email hosting.
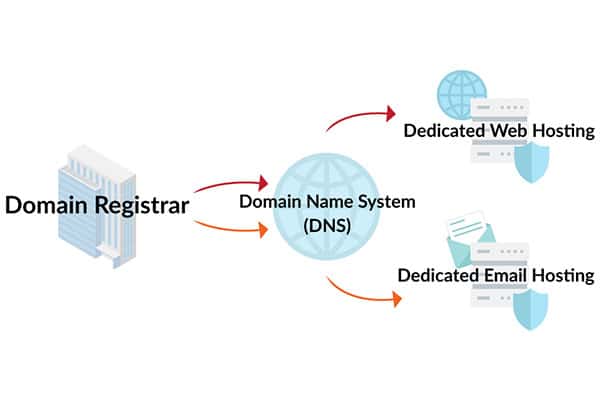
Setting Up Dns Records
Setting up DNS records is a crucial step in email hosting. DNS, or Domain Name System, helps direct email traffic to the correct server. By configuring DNS records, you ensure that emails reach your domain without issues. Let’s dive into the essentials of setting up DNS records for email hosting.
Understanding Dns
DNS stands for Domain Name System. It translates domain names into IP addresses. This process allows browsers to load internet resources. For email hosting, DNS directs emails to your mail server. Understanding DNS is key to successful email hosting.
Configuring Mx Records
MX stands for Mail Exchanger. MX records direct emails to your mail server. To set up MX records, log in to your domain registrar. Find the DNS settings or DNS management section. Add a new MX record with your mail server’s information. Set the priority for the MX record. Lower numbers have higher priority. Save the changes and wait for them to propagate.

Credit: www.hostpapa.com
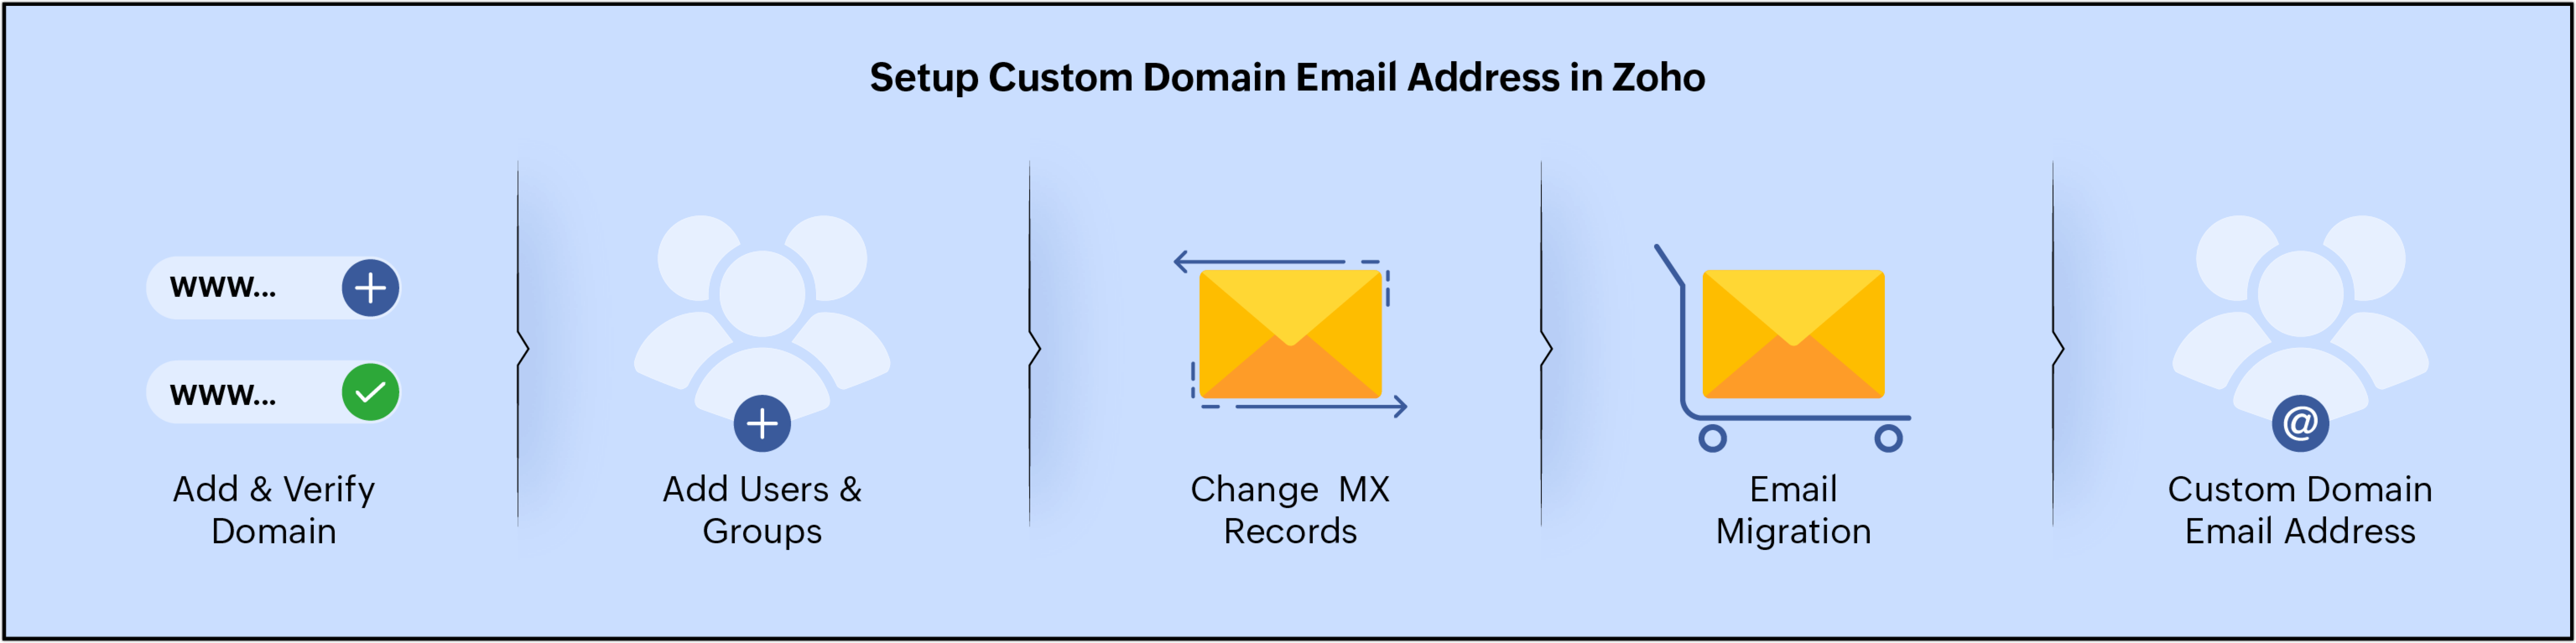
Creating Email Accounts
Creating email accounts for your domain is an essential step. It gives you professional communication channels and a unique identity. This section will help you understand how to create email accounts in your email hosting setup.
Admin Panel Overview
The admin panel is the control center for your email hosting. It allows you to manage all aspects of your email accounts. First, log into your hosting account. Navigate to the email section. Here, you will see options to add, manage, and delete email accounts.
Adding New Users
To add new users, find the option labeled “Add New User” or “Create Email Account.” Click on it. Fill in the required fields. These usually include the user’s name and desired email address. Set a strong password for the account. Click on the “Create” button. The new email account will be created.
Repeat this process for each user you need to add. Each user will have their own unique email address. They can log in using their credentials. This ensures secure and professional communication for your domain.
Configuring Email Clients
Setting up email hosting for your domain is a crucial step. It helps you manage your business communications. One important step is configuring email clients. You need to set up email clients on different devices. This allows you to access your email from anywhere. Let’s break it down into two parts: Desktop Clients Setup and Mobile Clients Setup.
Desktop Clients Setup
Desktop email clients make it easy to manage your emails. They offer a full range of features. Follow these steps to configure your email client on a desktop:
- Open your email client (e.g., Outlook, Thunderbird).
- Navigate to the account settings menu.
- Click on “Add New Account”.
- Enter your email address and password.
- Select the account type (IMAP or POP3).
- Enter the incoming and outgoing server details:
- Incoming Server: mail.yourdomain.com
- Outgoing Server: smtp.yourdomain.com
- Click “Next” and follow the prompts.
- Test the account to ensure it is set up correctly.
Mobile Clients Setup
Mobile email clients are essential for accessing emails on the go. They keep you connected. Here is how to set up your email client on a mobile device:
- Open your email app (e.g., Gmail, Apple Mail).
- Go to the account settings section.
- Tap “Add Account”.
- Enter your email address and password.
- Choose the account type (IMAP or POP3).
- Enter the server settings:
- Incoming Server: mail.yourdomain.com
- Outgoing Server: smtp.yourdomain.com
- Tap “Next” and complete the setup process.
- Check your inbox to ensure everything is working.
Configuring email clients can be simple. Just follow these steps. You will have your email up and running in no time.
Implementing Security Measures
Setting up email hosting for a domain involves configuring DNS settings and securing email accounts. Use strong passwords and enable two-factor authentication. Regularly update and monitor your security measures.
Securing your email hosting is crucial. It protects sensitive information and maintains user trust. This section covers essential security steps. These will ensure your email system is secure.
Setting Up Ssl/tls
Start with SSL/TLS. These protocols encrypt data between servers and clients. They prevent unauthorized access. Most hosting providers support SSL/TLS. Check your provider’s documentation. Follow their steps to enable it.
Using SSL/TLS is not optional. It’s a must-have for secure communication. It keeps your emails safe from interception. Without it, data can be exposed.
Enabling Two-factor Authentication
Two-Factor Authentication (2FA) adds an extra layer. It requires a second verification step. This could be a code sent to your phone. Or a fingerprint scan. It ensures only authorized users can access accounts.
Most email hosting providers offer 2FA. Enable it in the security settings. It greatly reduces the risk of unauthorized access. It’s a simple yet powerful security measure. Always use 2FA for all admin accounts.
“`
Migrating Existing Emails
Setting up email hosting for a domain involves several steps. Migrating existing emails is often the most challenging part. This process ensures all past emails and contacts are available on your new email host. Here’s a step-by-step guide to help you through it.
Exporting Emails
To start, you need to export your emails from the current email host. This process varies depending on the email service you are using. Here’s a general guide:
- Open your email client or webmail.
- Find the option to export or backup your emails.
- Choose the export format. Common formats include .pst, .eml, or .mbox.
- Select the folders or emails you want to export.
- Save the exported files to your computer.
Make sure to double-check that all important emails have been included in the export. Missing emails can cause issues later.
Importing To New Host
Now that you have your emails exported, it’s time to import them to your new email host. Follow these steps:
- Log in to your new email hosting account.
- Find the option to import emails.
- Select the import format that matches your exported files.
- Upload the exported email files from your computer.
- Wait for the import process to complete. This may take some time.
After the import is complete, check your new email account to ensure all emails and folders are present. This will help you confirm that the migration was successful.
Credit: www.zoho.com
Managing Email Storage
Effective email storage management ensures your email hosting runs smoothly. It helps in avoiding unnecessary costs and keeping your inbox clutter-free. Let’s dive into two key aspects of managing email storage: Archiving Emails and Handling Quotas.
Archiving Emails
Archiving emails is a smart way to manage old messages. It keeps your inbox organized and helps in reducing storage space. Here are some steps to archive emails:
- Create a dedicated archive folder.
- Move old, important emails to this folder.
- Set up automatic archiving rules to save time.
Archiving is essential for businesses that need to retain email records for compliance. It also ensures quick access to old emails without cluttering the main inbox.
Handling Quotas
Most email hosting services set limits on storage space, known as quotas. Managing these quotas helps you avoid running out of space. Here’s how to handle quotas effectively:
| Action | Description |
|---|---|
| Check Usage | Regularly monitor your storage usage to avoid surprises. |
| Delete Unnecessary Emails | Remove spam, junk, and old emails that are no longer needed. |
| Optimize Attachments | Use cloud storage for large files instead of email attachments. |
| Upgrade Plan | If needed, upgrade your plan to get more storage space. |
Handling quotas efficiently ensures your email service remains fast and reliable. It avoids the risk of missing important emails due to a full inbox.
Troubleshooting Common Issues
Setting up email hosting for a domain can be challenging. Even with the best setup, issues may arise. Here, we will address some common problems. This will help ensure your email service runs smoothly.
Email Delivery Problems
Email delivery problems can cause a lot of frustration. Sometimes, emails don’t reach their destination. They might get stuck in the outbox or not send at all. Check your domain’s DNS settings. Ensure your MX records are correct. Incorrect settings can block email delivery.
Another common issue is a full mailbox. Clear out old emails to free up space. Also, check if your ISP is blocking port 25. This port is used to send emails. If blocked, switch to port 587 or 465. These are alternative ports for sending emails.
Spam Filtering Issues
Spam filtering is important for email security. But sometimes, it filters out important emails. Check your spam folder regularly. Mark important emails as “Not Spam.” This helps the filter learn which emails are important.
Adjust your spam filter settings if needed. Make them less strict to avoid losing important emails. Use a trusted spam filtering service. This can reduce the number of false positives. It also helps keep your inbox clean from unwanted emails.
Credit: momentum3growth.com
Best Practices For Email Management
Effective email management is crucial for any business. It ensures smooth communication and data integrity. Implementing best practices can save time and prevent issues. This section covers essential tips for managing your email hosting efficiently.
Regular Backups
Make sure to schedule regular backups of your email data. This helps in case of accidental deletions or server failures. Use automated tools to perform these backups. Store backup copies in multiple locations for added safety. Regularly check your backup system to ensure it is working properly.
User Training
Train your users on best email practices. This includes recognizing phishing emails and creating strong passwords. Provide guidelines on how to organize emails and manage inboxes. Regular training sessions can keep everyone updated on the latest security threats. Encourage users to report suspicious emails immediately.
Frequently Asked Questions
What Is Email Hosting For A Domain?
Email hosting provides custom email addresses using your domain name. This makes your business appear professional. It involves setting up email servers and managing email accounts.
How To Choose An Email Hosting Provider?
Choose a provider with strong security, reliable uptime, and good customer support. Compare features, costs, and user reviews.
What Are The Benefits Of Email Hosting?
Email hosting offers professional email addresses, enhanced security, and better reliability. It also provides advanced features and support.
How To Configure Dns For Email Hosting?
Access your domain’s DNS settings. Add MX records provided by your email hosting provider. This directs emails to the correct server.
Conclusion
Setting up email hosting for your domain is simple and essential. Follow the steps outlined, and your business will have a professional email presence. This enhances trust and communication with your clients. Remember, reliable email hosting keeps your messages secure and accessible.
By implementing these steps, you ensure a smooth email setup process. Happy emailing!